The Complete Guide to Kitchen Cabinet Wrapping in 2025
Learn everything about vinyl wrapping kitchen cabinets - from costs and materials to DIY tips and professional installation. Save up to 70% vs cabinet replacement.
Supplies Needed
- •Architectural Vinyl Film – BODAQ or 3M brand, approximately 50-100 sq ft depending on kitchen size
- •Squeegee – Plastic application squeegee for smoothing vinyl
- •Heat Gun – For activating adhesive and conforming to edges
- •Utility Knife – Sharp blade for precise cutting
- •Measuring Tape – For accurate measurements
- •Isopropyl Alcohol – For surface cleaning and prep
What is Cabinet Wrapping?
Cabinet wrapping is a renovation technique where architectural-grade vinyl film is applied to your existing cabinet surfaces to completely transform their appearance. Think of it like a high-quality "skin" that adheres to your cabinets, giving them a brand-new look without the cost and disruption of replacement.
The vinyl used isn't the cheap contact paper you might find at a dollar store. Professional cabinet wrapping uses architectural vinyl - the same material used to wrap luxury cars, yachts, and commercial interiors. It's designed to last 10-15 years and withstand the heat, moisture, and daily wear of a busy kitchen.
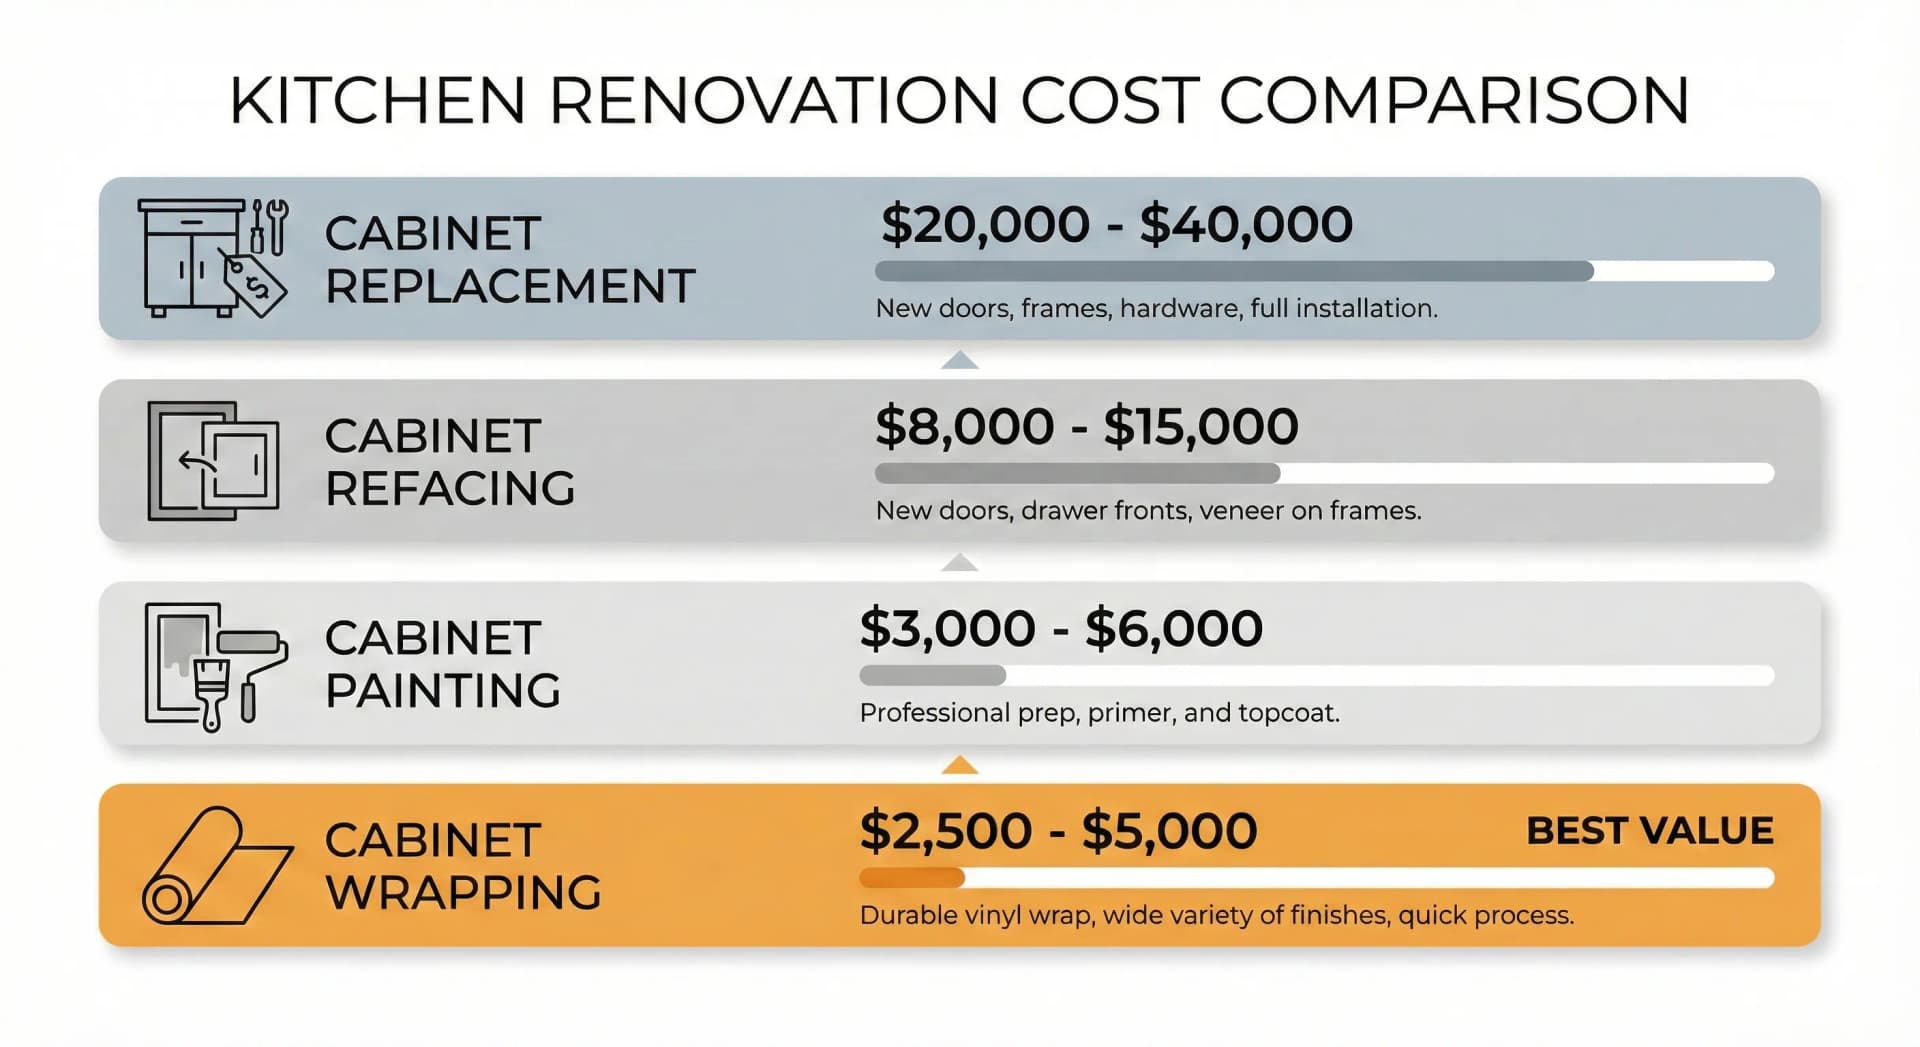
Why Choose Wrapping Over Other Options?
| Option | Cost | Timeline | Durability | Disruption |
|---|---|---|---|---|
| Vinyl Wrapping | 3,200-5,500+ | 1-2 days | 10-15 years | Minimal |
| Cabinet Painting | 3,000-6,000 | 3-5 days | 5-7 years | Moderate |
| Cabinet Refacing | 8,000-15,000 | 1-2 weeks | 15-20 years | Moderate |
| Full Replacement | 15,000-40,000 | 2-4 weeks | 20+ years | Major |
Understanding Cabinet Wrap Materials
BODAQ Interior Film
BODAQ is a Korean-manufactured architectural vinyl that's become the industry standard in North America. Key features include:
- Thickness: 6-8 mil (0.15-0.20mm)
- Adhesive: Pressure-sensitive with air-release channels
- Heat Resistance: Up to 80°C (176°F)
- Water Resistance: Fully waterproof
- Warranty: 10 years indoor use
3M DI-NOC
3M's architectural film is another premium option, particularly popular for commercial applications:
- Thickness: 4-6 mil (0.10-0.15mm)
- Adhesive: Comply adhesive with micro-channels
- Heat Resistance: Similar to BODAQ
- Warranty: 12 years indoor use
Which Material Should You Choose?
For most residential kitchen projects, BODAQ offers the best value. It's slightly thicker than 3M (which means better durability), costs less, and offers a wider range of wood grain patterns. 3M is excellent for commercial projects where the warranty matters more.
Step-by-Step Cabinet Wrapping Process
Step 1: Surface Preparation
Proper preparation is the foundation of a successful wrap job. Skipping or rushing this step leads to bubbles, lifting, and premature failure.
What needs to happen:
- Remove all hardware - handles, hinges, knobs
- Clean thoroughly - degrease with isopropyl alcohol
- Sand if needed - lightly sand glossy surfaces
- Fill imperfections - use wood filler for dents or scratches
- Prime damaged areas - primer helps adhesion on repairs
Time required: 2-4 hours for a medium kitchen
Step 2: Measuring and Cutting
Accurate measurements prevent material waste and ensure clean edges.
Pro tips:
- Add 2-3 inches to each dimension for overlap
- Label each piece with the corresponding door/drawer
- Cut vinyl with the protective backing still on
- Use a sharp blade - dull blades tear vinyl
Step 3: Application
This is where technique matters most. Professional installers develop these skills over hundreds of applications.
The process:
- Peel backing partially - expose only 4-6 inches at a time
- Position carefully - align the vinyl before pressing
- Squeegee from center - push air outward, not sideways
- Apply heat at edges - helps vinyl conform to curves
- Trim excess - use a sharp blade at a 45° angle
Common mistakes to avoid:
- ❌ Working in cold temperatures (below 18°C/65°F)
- ❌ Rushing the squeegee step
- ❌ Stretching vinyl (causes bounce-back wrinkles)
- ❌ Cutting too close to edges initially
Step 4: Finishing Details
The details separate a professional job from a DIY attempt.
Finishing touches:
- Seal edges with a primer pen
- Use a heat gun on all corners and edges
- Reinstall hardware in same holes
- Clean finished surfaces with mild soap
Cost Breakdown
What Affects Price?
1. Number of Surfaces The primary cost driver. More doors and drawers = higher cost.
| Kitchen Size | Typical Count | Signature Tier Cost |
|---|---|---|
| Small (galley/apartment) | 15-20 surfaces | $3,600 (min) |
| Medium (average home) | 20-30 surfaces | 3,900-5,850 |
| Large (open concept) | 30-40 surfaces | 5,850-7,800 |
2. Tier (driven by your finish + scope)
- Essentials (
170/surface,3,200 minimum): solid colors only, doors and drawer fronts, installation guarantee - Signature (
195/surface,3,600 minimum): wood / stone / marble / gloss / real metal / leather / painted wood, plus toe kicks / end panels / range hood, two-tone, 5-year workmanship + 10-year material warranty, priority within 10 days - Showcase (
230/surface,4,500 minimum): exclusive metals / fabrics, fridge / dishwasher / wine fridge wraps, in-home sample visit, priority within 7 days, 30-day walkthrough, annual inspections years 1–3
3. Cabinet Condition
Well-maintained cabinets in good condition require minimal prep. Damaged, peeling, or heavily textured surfaces may need additional work.
4. Kitchen Complexity
Islands, corner cabinets, and unusual configurations add to labor time.
DIY vs Professional Installation
When DIY Makes Sense
- You have experience with vinyl application
- Small project (single cabinet, pantry door)
- Budget is extremely tight
- You're prepared for imperfect results
Why Most Choose Professional
- Time: Pros complete a kitchen in 1-2 days; DIY takes 3-5 days
- Results: Professional finish vs visible seams and bubbles
- Warranty: Professional work comes guaranteed
- Tools: Pros have specialized equipment
- Material waste: Pros minimize waste; DIYers often need 30-40% extra
Cost Comparison
For a medium kitchen (25 surfaces):
| Approach | Materials | Labor | Total | Time |
|---|---|---|---|---|
| Professional | Included | Included | 4,200-5,500+ | 1-2 days |
| DIY | 800-1,200 | Your time | 800-1,200 | 15-25 hours |
The DIY savings of 3,000-4,300 comes at the cost of 15-25 hours of work and likely imperfect results.
Maintenance and Care
Daily Care
- Wipe with soft cloth
- Use mild dish soap for spills
- Dry after cleaning
What to Avoid
- ❌ Abrasive cleaners or scrubbers
- ❌ Acetone or harsh solvents
- ❌ Excessive heat (keep away from stovetop)
- ❌ Sharp objects directly on surface
Long-Term Care
- Address lifting edges immediately with heat gun
- Reapply edge sealer annually in high-use areas
- Avoid placing hot pots directly on wrapped surfaces
Frequently Asked Questions
Is cabinet wrapping worth it?
For most homeowners with structurally sound cabinets, absolutely yes. You get a completely transformed kitchen for 60-70% less than replacement, completed in days instead of weeks, with a 10+ year lifespan. The only scenarios where replacement might be better:
- Cabinets are structurally damaged or water-damaged
- You want to change the cabinet layout entirely
- Cabinets are very low quality/cheap particleboard
Will wrapped cabinets peel?
Quality architectural vinyl properly installed should not peel. Peeling occurs due to:
- Poor surface preparation
- Inferior vinyl materials
- Installation in extreme temperatures
- Damage from sharp objects
Professional installation with quality materials includes a warranty against peeling.
Can I wrap laminate cabinets?
Yes! Laminate is actually one of the easiest surfaces to wrap because it's smooth and non-porous. The existing laminate provides an excellent base for vinyl adhesion.
What finishes are available?
The variety is extensive:
- Wood grains: Oak, walnut, maple, cherry, reclaimed wood
- Solids: Matte, satin, gloss in any color
- Stone/marble: Carrara, calacatta, granite effects
- Special: Leather, fabric, brushed metal, concrete
Getting Started
Ready to transform your kitchen with cabinet wrapping? Here's your next step:
- Get an instant estimate with our Cost Calculator
- Visualize your transformation with our AI Kitchen Visualizer
- Book a free consultation to discuss your project
This guide was created by the ArmorKitchenWrap team, professional cabinet wrapping specialists serving the Greater Toronto Area since 2020.
Frequently Asked Questions
Ready to Transform Your Kitchen?
Upload photos of your kitchen and get an instant quote for professional cabinet wrapping.